User Guide/Workspace: Difference between revisions
No edit summary |
(→Modes) |
||
| (60 intermediate revisions by 2 users not shown) | |||
| Line 1: | Line 1: | ||
{{DISPLAYTITLE:{{SUBPAGENAME}}}} | {{DISPLAYTITLE:{{SUBPAGENAME}}}} | ||
{{UG_Workspace}} | |||
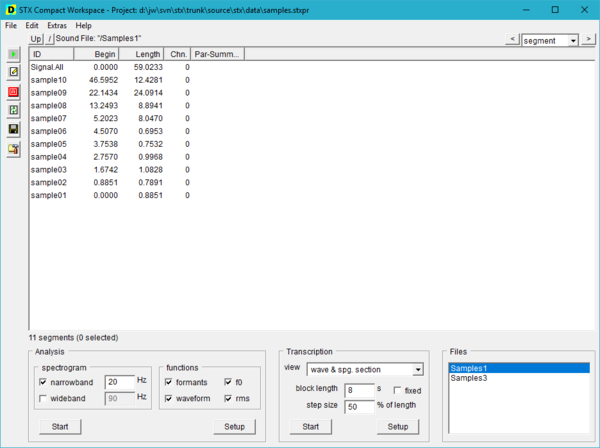
The Workspace is the default application in {{STX}}. The Workspace is where you organise your project's sound files and run your analyses. | |||
[[File:Stx ug workspace compact overview.png|600px]] | |||
__TOC__ | |||
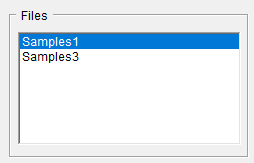
When you open a sound file in {{STX}}, it is added to your project file. The sound files in your project are listed in the ''Files'' list: | |||
[[File:Stx_ug_workspace_compact_overview_files.png]] | |||
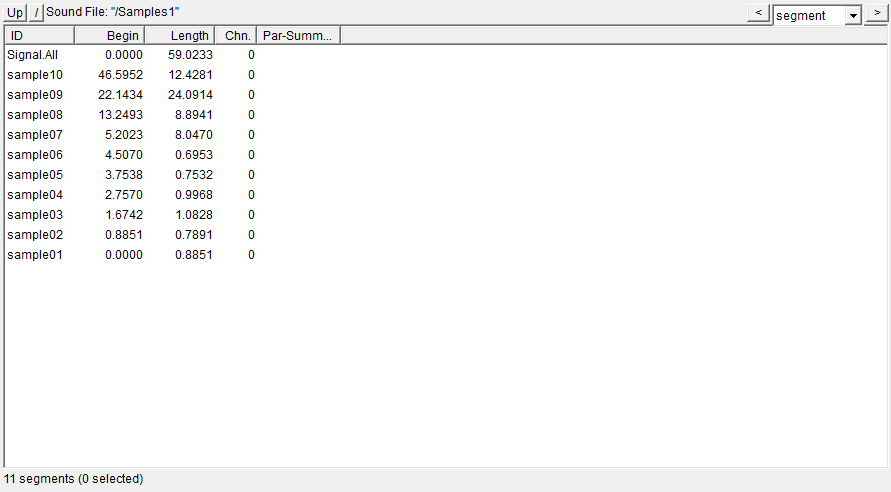
When you select a sound file in the Files list, any segments the sound file contains are displayed in the segment detail view: | |||
[[File:Stx_ug_workspace_compact_overview_detail.png]] | |||
When you want to analyse part of your sound file, you select a segment of the sound file and then choose either ''Start'' from the ''Analysis'' or ''Transcription'' controls. This will open a new window with the relevant analysis. | |||
===Analysis=== | |||
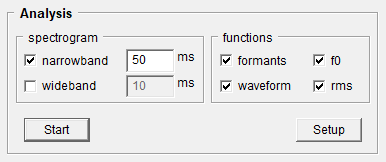
The ''Analysis'' section will by default display a narrowband spectrogram with formants tracks as well as an F0, RMS and wave graph of the selected segment. | |||
[[File:stx_ug_workspace_compact_analysis.png]] | |||
You can enable/disable graphs here, before starting the analysis. If you need other features, please use the [[User_Guide/Spectrogram_and_Parameter_Viewer/Settings_Dialog|''Setup'']] dialog. | |||
===Transcription=== | |||
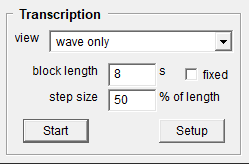
The ''Transcription'' section of the workspace lets you start the [[User_Guide/SPExL/Transcription_Script|Transcription]] application. This application was specifically designed for transcribing. | |||
[[File:stx_ug_workspace_compact_transcription.png]] | |||
You can change some basic settings here: | |||
;view:Display the sound file as a waveform or both a waveform and a spectrogram (see [[User_Guide/SPExL/Transcription_Script#Spectrogram_.2F_Waveform_Views|here]] for more details). | |||
;block length:If the sound file is long, you can view it in blocks to increase loading speed. | |||
;step size:When scrolling through blocks, the next block will overlap by this value with the last block. | |||
;Start:Start the Transcription application. | |||
;Setup:Open the setup dialog for further settings. | |||
===Compact and Extended Mode=== | |||
By default, the Workspace starts in the ''Compact Mode''. This is a simplified GUI which enables quick access to the most frequently used functions of STx. The Workspace can also be run in ''[[/Extended_Mode|Extended Mode]]'', which exposes all STx functionality to the user. To change mode, choose either <samp>Compact</samp> or <samp>Extended</samp> from the <samp>File->Select Workspace Mode</samp> menu. | |||
The ''Compact'' mode was added to {{STX}} in version 5.0. | |||
===Extras=== | |||
The ''Extras'' menu contains some extra functionality, you might like to quickly access from the ''Compact'' mode. | |||
;Start Realtime Spectrum Analyser:Analyse an audio input signal in real-time. | |||
;Start Signal Recorder:Record a sound file from any audio input. | |||
;Start Signal Plot and Edit:Plot a waveform of the selected segment. This is also a basic wave editor. | |||
;Export Parameters:[[User_Guide/Workspace/Application_and_Setup_Tree/Parameter_Processing#Parameter_Export|Export previously calculated parameters]]. | |||
;Copy Parameters to Clipboard:Copy the selected segment's parameters to the clipboard. | |||
;Import Segments from Wordlist-File:Import a transcription from a file. One sentence per line. This estimates the position of the segments based on word length. | |||
;Import Segments from Textgrid-File:[[User_Guide/Toolbox/Import_PRAAT_TextGrid|Import a TextGrid file into the selected sound file]]. | |||
;Segment automatically using runMAUSBasic:Segment the selected sound file using the WebMAUS interface [[User_Guide/Toolbox/runMAUSBasicDlg|runMAUSBasic]]. | |||
;Export Segments to Sound Files: Export each of the selected segments to an individual sound file. | |||
;Anonymize Signals and Transcriptions:[[User_Guide/Scripts/Anonymize.sts|Anonymize the selected sound file's segments based on a segment attribute]]. | |||
;Signal Up/Down Sampling:Upsample or downsample a sound file. | |||
;Show Scripts Dialog:Display the [[User_Guide/The_Script_Controller|scripts dialog]] in the Workspace to load and run scripts. | |||
;Show Find/Select Dialog:Display the [[User_Guide/Workspace_/Detail_Find_Select|Find/Select dialog]] in the Workspace to search for segments contain the search term. | |||
;General Settings:Open the [[User_Guide/Workspace/Application_and_Setup_Tree/Options/General_Settings|general settings dialog]]. | |||
Latest revision as of 07:56, 30 September 2019
The Workspace is the default application in STx. The Workspace is where you organise your project's sound files and run your analyses.
When you open a sound file in STx, it is added to your project file. The sound files in your project are listed in the Files list:
When you select a sound file in the Files list, any segments the sound file contains are displayed in the segment detail view:
When you want to analyse part of your sound file, you select a segment of the sound file and then choose either Start from the Analysis or Transcription controls. This will open a new window with the relevant analysis.
Analysis
The Analysis section will by default display a narrowband spectrogram with formants tracks as well as an F0, RMS and wave graph of the selected segment.
You can enable/disable graphs here, before starting the analysis. If you need other features, please use the Setup dialog.
Transcription
The Transcription section of the workspace lets you start the Transcription application. This application was specifically designed for transcribing.
You can change some basic settings here:
- view
- Display the sound file as a waveform or both a waveform and a spectrogram (see here for more details).
- block length
- If the sound file is long, you can view it in blocks to increase loading speed.
- step size
- When scrolling through blocks, the next block will overlap by this value with the last block.
- Start
- Start the Transcription application.
- Setup
- Open the setup dialog for further settings.
Compact and Extended Mode
By default, the Workspace starts in the Compact Mode. This is a simplified GUI which enables quick access to the most frequently used functions of STx. The Workspace can also be run in Extended Mode, which exposes all STx functionality to the user. To change mode, choose either Compact or Extended from the File->Select Workspace Mode menu.
The Compact mode was added to STx in version 5.0.
Extras
The Extras menu contains some extra functionality, you might like to quickly access from the Compact mode.
- Start Realtime Spectrum Analyser
- Analyse an audio input signal in real-time.
- Start Signal Recorder
- Record a sound file from any audio input.
- Start Signal Plot and Edit
- Plot a waveform of the selected segment. This is also a basic wave editor.
- Export Parameters
- Export previously calculated parameters.
- Copy Parameters to Clipboard
- Copy the selected segment's parameters to the clipboard.
- Import Segments from Wordlist-File
- Import a transcription from a file. One sentence per line. This estimates the position of the segments based on word length.
- Import Segments from Textgrid-File
- Import a TextGrid file into the selected sound file.
- Segment automatically using runMAUSBasic
- Segment the selected sound file using the WebMAUS interface runMAUSBasic.
- Export Segments to Sound Files
- Export each of the selected segments to an individual sound file.
- Anonymize Signals and Transcriptions
- Anonymize the selected sound file's segments based on a segment attribute.
- Signal Up/Down Sampling
- Upsample or downsample a sound file.
- Show Scripts Dialog
- Display the scripts dialog in the Workspace to load and run scripts.
- Show Find/Select Dialog
- Display the Find/Select dialog in the Workspace to search for segments contain the search term.
- General Settings
- Open the general settings dialog.
