User Guide/Project/User-defined Attribute: Difference between revisions
m (Text replace - "S_TOOLS-STx" to "{{STX}}") |
No edit summary |
||
| Line 1: | Line 1: | ||
{{DISPLAYTITLE:{{SUBPAGENAME}}}} | {{DISPLAYTITLE:{{SUBPAGENAME}}}} | ||
{{UG_Project}} | |||
You can add attributes to any project element by editing the properties of the selected element. Attributes not automatically set by {{STX}} are called 'user-defined' attributes. Set an attribute in the bottom edit box with the format <code>songLyric=God save our gracious Queen;</code> and delete it by assigning no value (e.g. <code>songLyric=;</code>). | |||
In order to see user-defined attributes in the Detail, press the [[User Guide/Workspace#Buttons|Attr button]] to search for element attributes. | |||
If you need to edit the user-defined attributes often, you might like to try developing a [[User Guide/Project/Dialog Template|dialog template]] to facilitate data entry. | |||
You can copy a project element's attributes by right-clicking on the attribute and selecting Copy Attributes. A selection of the following will be available, depending the element type: | |||
*Reference - the path from the root of the project to this element. This can be used in macros to reference this element. | |||
*ID - the ID of this element. The ID is unique on this level of the project. | |||
*Reference - the path from the root of the | |||
*ID - the ID of this element. The ID is unique on this level of the | |||
*Segment - the name of the selected segment | *Segment - the name of the selected segment | ||
*AudioRef - the Reference and the segment name separated by a semicolon (e.g. /AFiles/70_ba_da_ga_m.wav; Signal.All;) | *AudioRef - the Reference and the segment name separated by a semicolon (e.g. /AFiles/70_ba_da_ga_m.wav; Signal.All;) | ||
*Filename - the absolute path of the file associated with this element. | *Filename - the absolute path of the file associated with this element. | ||
*More - click for the Attributes -> Clipboard dialog box, where you can select multiple attributes as well as formatting options. | *More - click for the Attributes -> Clipboard dialog box, where you can select multiple attributes as well as formatting options. | ||
The Copy Attributes context menu option is not available for all | The Copy Attributes context menu option is not available for all project element types. | ||
You can copy the attributes of multiple elements. A new line is used between the attributes from different elements.=====Copying | You can copy the attributes of multiple elements. A new line is used between the attributes from different elements. | ||
=====Copying project attributes===== | |||
You can copy the attributes for the selected element in the | You can copy the attributes for the selected element in the project into the clipboard with the Copy Attributes dialog. Right-click on an element and select Copy Attributes from the context menu and then press More.... | ||
[[File:ws_d_attributes_to_clipboard.png]] | [[File:ws_d_attributes_to_clipboard.png]] | ||
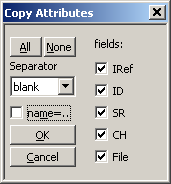
All of the selected element's attributes are available for copying. You can select all (All) or none (None) of the attributes in one go. By default, the field entries in the clipboard are blank separated. Check the name=.. checkbox if the format <code>fieldName=fieldValue</code> should be used. | All of the selected element's attributes are available for copying. You can select all (All) or none (None) of the attributes in one go. By default, the field entries in the clipboard are blank separated. Check the name=.. checkbox if the format <code>fieldName=fieldValue</code> should be used. | ||
Revision as of 08:36, 18 September 2015
You can add attributes to any project element by editing the properties of the selected element. Attributes not automatically set by STx are called 'user-defined' attributes. Set an attribute in the bottom edit box with the format songLyric=God save our gracious Queen; and delete it by assigning no value (e.g. songLyric=;).
In order to see user-defined attributes in the Detail, press the Attr button to search for element attributes.
If you need to edit the user-defined attributes often, you might like to try developing a dialog template to facilitate data entry.
You can copy a project element's attributes by right-clicking on the attribute and selecting Copy Attributes. A selection of the following will be available, depending the element type:
- Reference - the path from the root of the project to this element. This can be used in macros to reference this element.
- ID - the ID of this element. The ID is unique on this level of the project.
- Segment - the name of the selected segment
- AudioRef - the Reference and the segment name separated by a semicolon (e.g. /AFiles/70_ba_da_ga_m.wav; Signal.All;)
- Filename - the absolute path of the file associated with this element.
- More - click for the Attributes -> Clipboard dialog box, where you can select multiple attributes as well as formatting options.
The Copy Attributes context menu option is not available for all project element types. You can copy the attributes of multiple elements. A new line is used between the attributes from different elements.
Copying project attributes
You can copy the attributes for the selected element in the project into the clipboard with the Copy Attributes dialog. Right-click on an element and select Copy Attributes from the context menu and then press More....
All of the selected element's attributes are available for copying. You can select all (All) or none (None) of the attributes in one go. By default, the field entries in the clipboard are blank separated. Check the name=.. checkbox if the format fieldName=fieldValue should be used.
