User Guide/Workspace: Difference between revisions
From STX Wiki
Jump to navigationJump to search
No edit summary |
No edit summary |
||
| Line 45: | Line 45: | ||
|- | |- | ||
|[[File:resource_new.png]] | |[[File:resource_new.png]] | ||
|Add an element to the selected element in the Detail or the Overview (whichever is active <nowiki>-</nowiki> default: Detail). The type of element you can add depends on the context (e.g. you cannot add a | |Add an element to the selected element in the Detail or the Overview (whichever is active <nowiki>-</nowiki> default: Detail). The type of element you can add depends on the context (e.g. you cannot add a sound file to a sound file). | ||
|- | |- | ||
|[[File:resource_dosave.png]] | |[[File:resource_dosave.png]] | ||
|Save the Workspace and the | |Save the Workspace and the Project files. | ||
|- | |- | ||
|[[File:resource_toolbox.png]] | |[[File:resource_toolbox.png]] | ||
| Line 59: | Line 59: | ||
[[File:ws_channel_mapping.png]] | [[File:ws_channel_mapping.png]] | ||
==Hotkeys== | |||
There are many [[User_Guide/Workspace/Workspace_Hotkeys|hotkeys]] available in the Workspace. | |||
<splist | <splist | ||
Revision as of 12:40, 17 November 2015
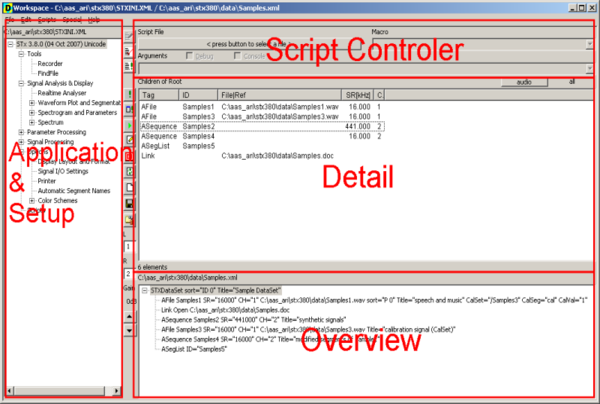
The Workspace is the default application in STx. When you install and run STx for the first time, this is what you will see. You organise sound files, select and modify analysis parameters, and run scripts in the Workspace.
The Workspace is divided into the following four areas:
- The Application & Setup Tree. The Application & Setup Tree provides access to the installed applications (e.g. Recorder, FindFile, Real-Time Analyser), the profiles used for signal analysis (Signal Analysis & Display), the analysis parameter export dialog, the digital signal processing functions (Signal Processing), general S_TOOLS-STx settings like color schemes, audio settings etc. (Options), and links to frequently used scripts.
- The Overview displays the basic elements in the current project, e.g. sound files and sequences.
- The Detail displays the metadata in the currently selected element in the Overview. Depending on which view is selected, you can see the existing segments, parameters or signal definitions.
- The Script Controller can be used to edit and run STx macros or run the STx console. For a guide to programming STx macros, see the Programmer Guide.
Buttons
| Edit the Script Controller script file using the application associated with *.stx or *.stx files. | |
| Test the Script Controller script. | |
| Run the Script Controller script. | |
| Run selected profile with selected Detail element. | |
| Open the settings for the selected profile with the option to run with selected Detail element. | |
| Edit the properties for the selected element in the Detail or the Overview (whichever is active - default: Detail). Do nothing if no element is selected. | |
| Search for element attributes. | |
| Force an update to the Workspace window. | |
| Add an element to the selected element in the Detail or the Overview (whichever is active - default: Detail). The type of element you can add depends on the context (e.g. you cannot add a sound file to a sound file). | |
| Save the Workspace and the Project files. | |
| Open the Toolbox. |
Channel Mapping
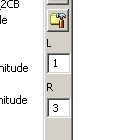
STx can map individual channels from wave files with more than two channels to the stereo channels available on a Windows system.
Hotkeys
There are many hotkeys available in the Workspace.
<splist parent= sort=asc sortby=title showpath=no liststyle=unordered kidsonly=yes >

